$1 tv tray or lap desk , car ride table, send it with college kids, this is a one in all space saver!

You will need:
1 cookie sheet (I got mine at the dollar store) I think the size inside (cooking area) is 9x13, but i didn't really check. if you don't know how big it is, just give yourself three extra inches on the each of the handle sides and 8 inches on each of the other two sides.
material 26 inches wide x 19 inches tall (you will need more if you have a bigger cookie sheet.
ribbon mine is 1 1/2 inches wide and 30 inches long- you need two strips of this.
all and hammer or drill
glue gun or favorite adhesive
batting or piece of foam to fit under tray- just a little bigger than your cookie sheet.
sewing machine

First make sure your batting (I would guess you could even use an old blanket or towel folded up, or an old pillow cut to size would work). I used both because my foam was just a little small. It needs to be just as big as the pan, so that the edges come all the way under the handles.

Measure your material like I mentioned above, just give yourself three extra inches on the each of the handle sides and 8 inches on each of the other two sides. then measure the inside of your cooking area. Mine is 9 inches, so I marked a spot at 3 inches and 6 inches for the holes. Repeat the process for the other handle.

use an all and hammer or a drill to punch holes into the handle.
The back side is VERY sharp! I learned that first hand~ nothing a Dora band aid couldn't fix, but it bled like crazy! SO, when you are done. . .

take a pair of pliers and smash those sharp edges down. I would actually recommend using a needle nose pair so that you can keep the hole big. I had to use a screwdriver to reopen the hole, so I could get the ribbon through.

Next I stitched the bating because i wanted a roll on each side of the pan-under the handles. If you measure just the right size, you probably can skip this step. I like the extra on mine.

I don't like to measure and be exact, so I just put the pan on the batting - just to make sure I had things just about right. I did need to trim my batting just a little to get just the right size.

fold the material into thirds- right side out...you want the edges where it will come together to be in the center of the underside of the pan. Lay the pan onto the material. you are looking to line the ribbon up under the holes you made. it doesn't have to be perfect, but you will want to get the ribbon close to centered under each hole. Pin into place - top layer of the material only.
Sew (or glue) the ribbon into place on the top layer only.

Once you are done with the ribbon, you need to pull it tight and pin it into place in the center- we are going to sew the edges up. I take as many shortcuts as i can, but this one is important- you don't want to sew the ribbion into the wrong place and have to take it all out and start again!
SO, flip it wrong side out, into the three folds. Pin it if you like and sew up the sides of fabric- where the handles are.

this is it finished wrong side out- the center where the white strip is, is NOT sewn.
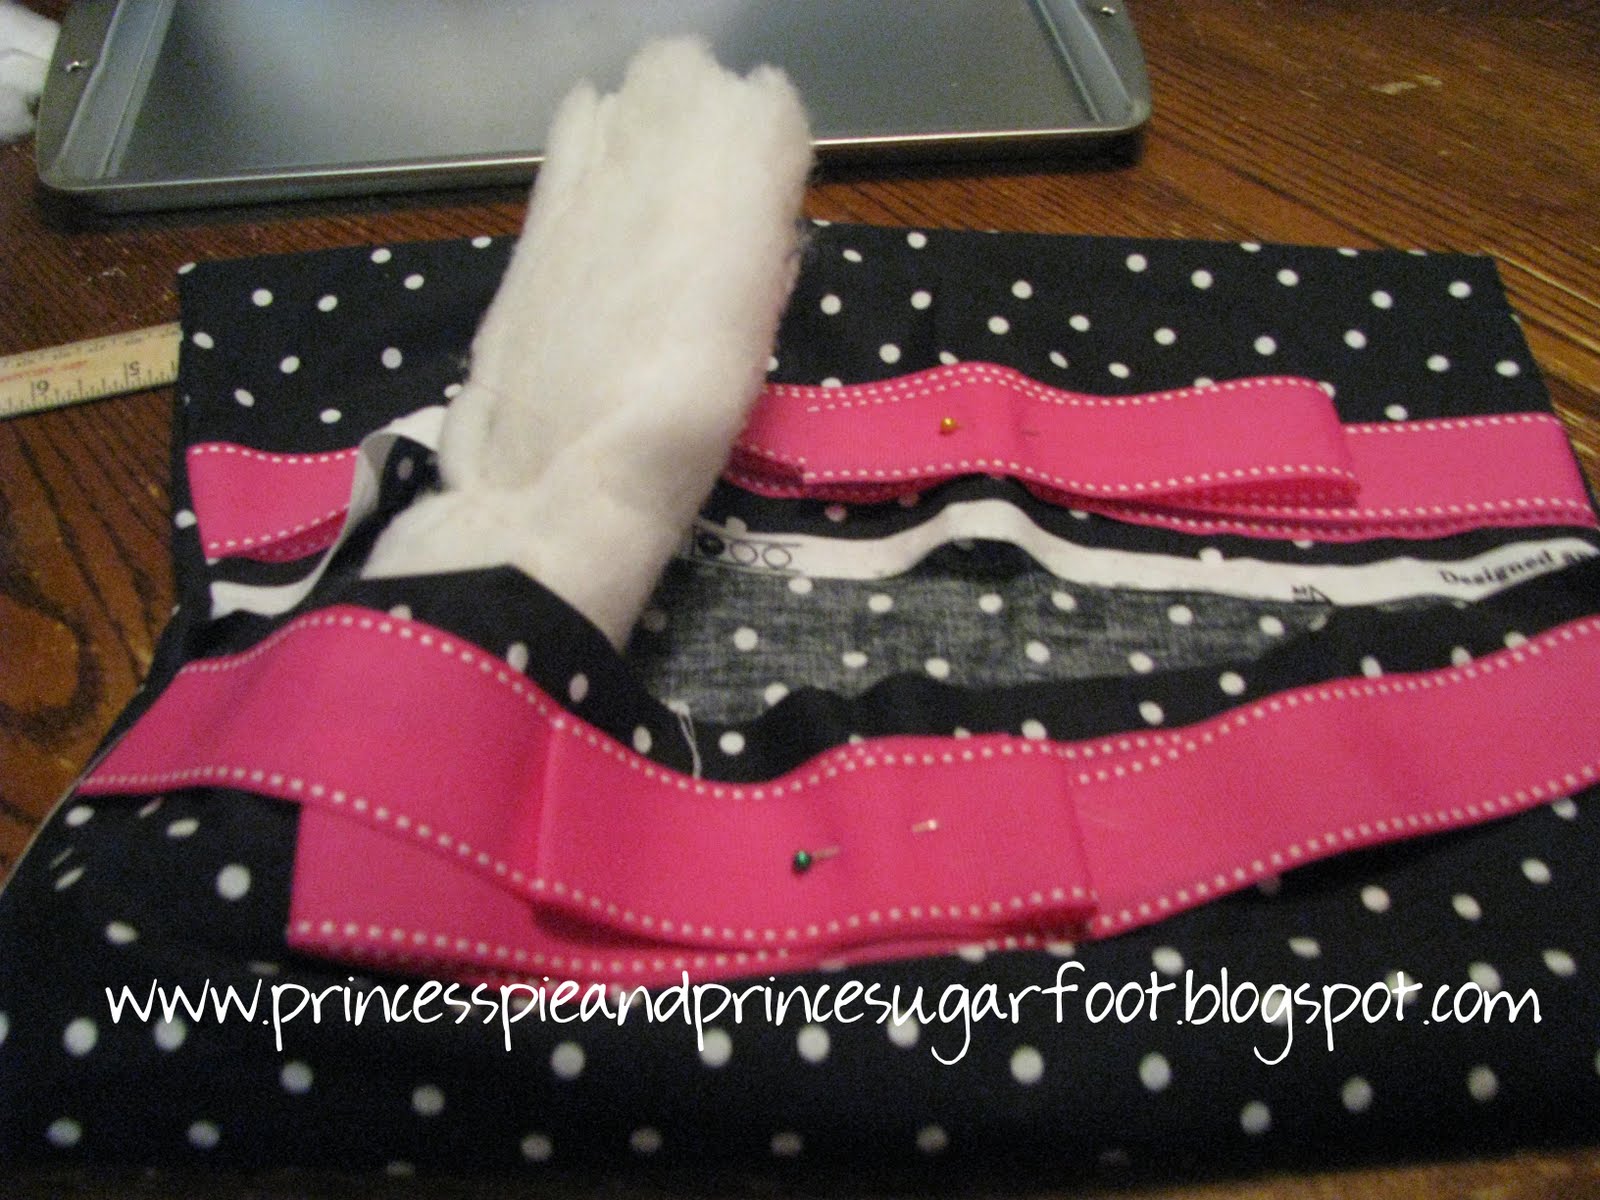
this is because now we need to turn it right side out, open our pocket and put the batting in!

Now all the batting is all in. Unpin the ribbon. I put my pan on to check that it still fit where I wanted it.


This is an optional step- I used this really strong E-6000 glue and ran a strip down the center. I don't think it really needed it, but just in case, I didn't want it to go anywhere!
Put your pan on top- I chose to put the baking area down against the material because I wanted to play a dice game while traveling. if you want a writing area, you can easily turn it over so the handles are against the material- I would go for a stronger cookie sheet if you go for a writing desk. The dollar store one is a little flimsy for that.

Push the pan against the glue if you glued it- again not sure you need it, it was really secure when I was done, but I wasn't sure it would be. You could also glue under each corner- in about an inch or so if you are worried about it coming undone. If you don't glue it, you could take it off and wash the underside- so it's up to you!
Pull the ribbon (or use a needele and push it through the hole) through the hole. My ribbon might have been just a little big for the size of my hole. It pulled a little, but turned out okay. You could also use thin ribbon and put beads on once you pull it through. Then I would probably put the thin ribbon back to the underside and tie it off really good, might even stitch it back through the batting and material to make sure it stays well. I am a firm believer that if I am going to make it, it is going to last!


don't forget to melt the edge of your ribbion so it doesn't frey!

this is the side look once it's all done.
That's it! now you are ready to enjoy your fun little table!
I bought the dice at the dollar store, and attached how to play our favorite dice game, ZONK.
Happy gaming all!
No comments:
Post a Comment