
Wednesday, January 25, 2012
valentine love
This is a cute, quick and cheap decoration! I got some valentine candycorns, poured them into this square vase and added a chocolate heart shapped candle (cause I had them) but I think it would be just as cute witha red tea light in it! I tied a piece of red tulle around the outside to finish them off.

Thursday, January 12, 2012
Pictoral Family Sign
Family sign
I wanted something
Here is the result...

- long,
- skinny,
- able to hold pictures,
- add some beauty and match the colors of my kitchen and front room (since you can see them both from the front door)
- I wanted the quote "Family, forever, always and no matter what.
- I didn't want to pay a whole lot for it!
Here is the result...
LOVE IT!!

supplies needed:
wood letters
paint of color choice
ribbion to match your room
6 frames- same color and size
really strong glue
clear tape
pictures
1. Went to local craft store, picked out my wood letters (mine are about 8 inches tall).
2. bought all the supplies listed above. Got everything on sale, bigger bonus! I went to the dollar store, and bought 6 matching 5x7 frames. I didn't want to use anything too expensive, just in case it didn't work out.
3. Paint letters, and let them dry
While they are drying you get to have a snack, change out a load of laundry, check your blog, all that fun stuff that makes the world go round!
4. When you are ready to work again, tie your ribbion onto the dry letters. I just added a little ribbion here and there until I was happy with the way it looked.
5. This is the hardest step of the whole thing. Pick 6 pictures~! I spent hours getting lost in pictures and trying to find some that had all the family in them! It was a really treat I tell you!
6 Once you weed out the good and find just the right ones, then you want to add your words. I used Adobe on my computer, but I think you can do it in word as well, just write over the top of your pictures. The quote I wanted is "Forever Always and no matter what." so each of my pictures has one word on it.
I wanted my pictures black and white so that they did not overwhelm the wall, and I wanted them cheap, so I just went into my Adobe program, lighted up the area where I wanted the words, added words to each picture. (on the picture above, i photoshoped the words in so you can see them, and there aren't any pictures yet- easier for you to see the words.) I did notice that I need to go back and lighten some areas even more, because the words are harder to see on the wall... that will get to wait for another day.
7. Print your pictures. I did mine on the printer, on regular paper and am happy with how they look. You can also just print them at the store, but then you get to wait for them!
8. Line up your frames, upsidedown, and get your super strong glue out.
9. One at a time, glue your frames together- I used the 5inch side on each of my frames, you can mix yours up however you like. Make sureyou line them up and only get enough glue to hold the frames together... you don't want glue spewing out the front, not pretty!
10. If you can, check to make sure you don't have glue anywhere it shouldn't be and if you do, quickly wipe that away.
11. You get a quick break! Let the glue dry ALL THE WAY! It doesn't take as long as it seems... really. so do something else fabulous for a couple of minutes and then go back and check on it.
12. Or if you like you can use this time to trim your pictures and get them in order.
13. if you took a break- now trim your pictures and get them in order. Place them in the frames in order.
14. lift it up and make sure you have it in order.
15. I used a little clear packaging tape on the seems of the glued frames to make sure they stay where I wanted them, and keep the backs on the frames.
16. Make sure you have your pictures the correct dirrection and order.
17. now take a black ribbion and either tie or glue it to each letter (I glued mine so I could get them just where I wanted them to hang... but I glued them a lot- meaning that the glue goes as far down the letter as I could get it. )
18. Let that dry a couple mins...
19. I used the hooks on the back of the frame to hold the ribbion in place, and then glued it down with that super strong glue, just to make sure it didn't go anywhere.
20. Let it dry a couple mins,
21. Hang it up! (measuring, hanging it straight, you are on your own!) I used 4 nails to get it on the wall.
22. Get a bowl of ice cream and enjoy the view! Or take a picture and post it on your blog to add some joy to someone elses day!
Hope you enjoy it as much as I do!
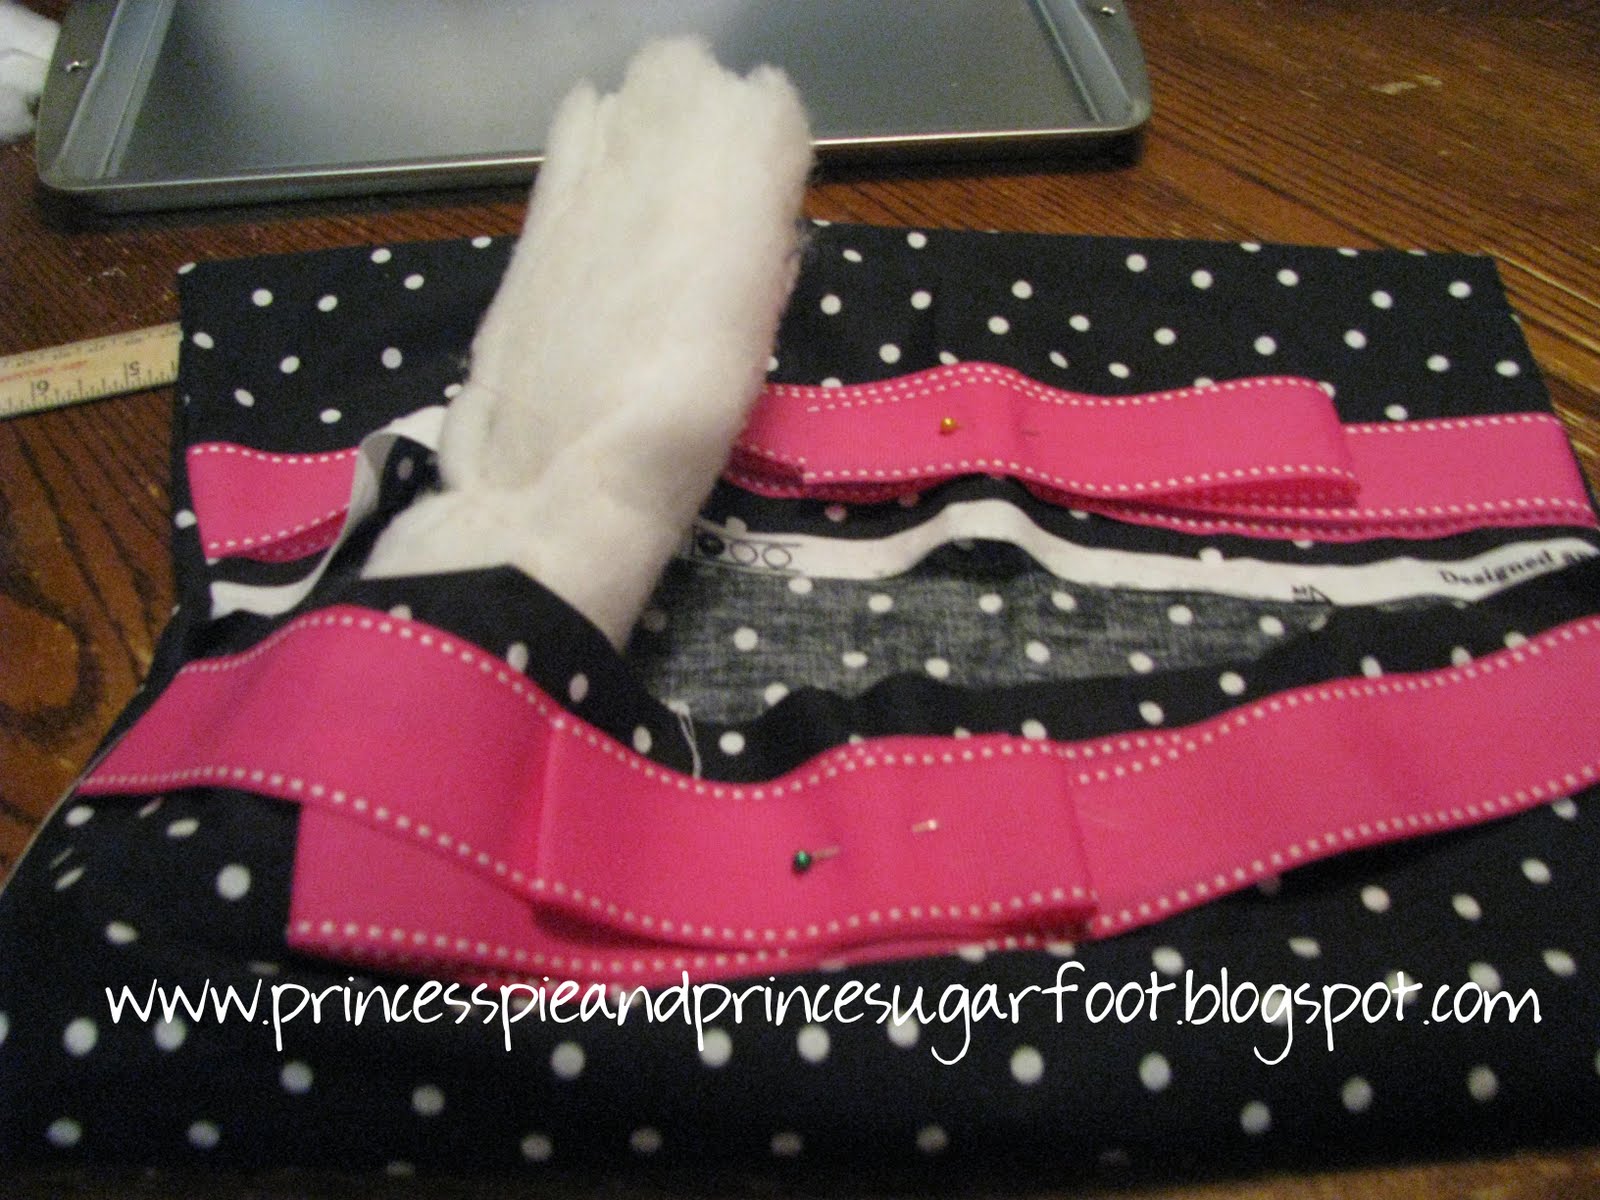
Coolest lap desk ever!
$1 tv tray or lap desk , car ride table, send it with college kids, this is a one in all space saver!

You will need:
1 cookie sheet (I got mine at the dollar store) I think the size inside (cooking area) is 9x13, but i didn't really check. if you don't know how big it is, just give yourself three extra inches on the each of the handle sides and 8 inches on each of the other two sides.
material 26 inches wide x 19 inches tall (you will need more if you have a bigger cookie sheet.
ribbon mine is 1 1/2 inches wide and 30 inches long- you need two strips of this.
all and hammer or drill
glue gun or favorite adhesive
batting or piece of foam to fit under tray- just a little bigger than your cookie sheet.
sewing machine

First make sure your batting (I would guess you could even use an old blanket or towel folded up, or an old pillow cut to size would work). I used both because my foam was just a little small. It needs to be just as big as the pan, so that the edges come all the way under the handles.

Measure your material like I mentioned above, just give yourself three extra inches on the each of the handle sides and 8 inches on each of the other two sides. then measure the inside of your cooking area. Mine is 9 inches, so I marked a spot at 3 inches and 6 inches for the holes. Repeat the process for the other handle.

use an all and hammer or a drill to punch holes into the handle.
The back side is VERY sharp! I learned that first hand~ nothing a Dora band aid couldn't fix, but it bled like crazy! SO, when you are done. . .

take a pair of pliers and smash those sharp edges down. I would actually recommend using a needle nose pair so that you can keep the hole big. I had to use a screwdriver to reopen the hole, so I could get the ribbon through.

Next I stitched the bating because i wanted a roll on each side of the pan-under the handles. If you measure just the right size, you probably can skip this step. I like the extra on mine.

I don't like to measure and be exact, so I just put the pan on the batting - just to make sure I had things just about right. I did need to trim my batting just a little to get just the right size.

fold the material into thirds- right side out...you want the edges where it will come together to be in the center of the underside of the pan. Lay the pan onto the material. you are looking to line the ribbon up under the holes you made. it doesn't have to be perfect, but you will want to get the ribbon close to centered under each hole. Pin into place - top layer of the material only.
Sew (or glue) the ribbon into place on the top layer only.

Once you are done with the ribbon, you need to pull it tight and pin it into place in the center- we are going to sew the edges up. I take as many shortcuts as i can, but this one is important- you don't want to sew the ribbion into the wrong place and have to take it all out and start again!
SO, flip it wrong side out, into the three folds. Pin it if you like and sew up the sides of fabric- where the handles are.

this is it finished wrong side out- the center where the white strip is, is NOT sewn.
this is because now we need to turn it right side out, open our pocket and put the batting in!

Now all the batting is all in. Unpin the ribbon. I put my pan on to check that it still fit where I wanted it.


This is an optional step- I used this really strong E-6000 glue and ran a strip down the center. I don't think it really needed it, but just in case, I didn't want it to go anywhere!
Put your pan on top- I chose to put the baking area down against the material because I wanted to play a dice game while traveling. if you want a writing area, you can easily turn it over so the handles are against the material- I would go for a stronger cookie sheet if you go for a writing desk. The dollar store one is a little flimsy for that.

Push the pan against the glue if you glued it- again not sure you need it, it was really secure when I was done, but I wasn't sure it would be. You could also glue under each corner- in about an inch or so if you are worried about it coming undone. If you don't glue it, you could take it off and wash the underside- so it's up to you!
Pull the ribbon (or use a needele and push it through the hole) through the hole. My ribbon might have been just a little big for the size of my hole. It pulled a little, but turned out okay. You could also use thin ribbon and put beads on once you pull it through. Then I would probably put the thin ribbon back to the underside and tie it off really good, might even stitch it back through the batting and material to make sure it stays well. I am a firm believer that if I am going to make it, it is going to last!


don't forget to melt the edge of your ribbion so it doesn't frey!

this is the side look once it's all done.
That's it! now you are ready to enjoy your fun little table!
I bought the dice at the dollar store, and attached how to play our favorite dice game, ZONK.
Happy gaming all!
Halloween tulle wreath
Halloween Wreath out of lefto overs~

Sadly, the pictures don't show how cute this project really is!
This one cost me absolutely nothing! Everything I had was just taking up space in my house!
This is the back side of the wreath, but it could easily be the front! I haven't taken a picture of it finished because I haven't hung it up yet! Mine has a white Ghost bell hanging in the center to finish it off. I will try to get a picture up soon!
You will need

a picture frame. mine is 8x10 in size, and was already black. Take the glass and back out. if yours is a different color, you can easily paint it.

a whole lot of tulle! Mine is left over from costumes, so it's just strips of black, black with purple sparkles, black with red sparkles and then the orange. I am going to say you need a yard total, maybe a yard and a half if you like it really full.
You will also need some fun little Halloween thing to hang from the center. and a thin black ribbon to attach it to the frame.

Here's how to do it! Just cut your strips into roughly 10-12 inch strips. Either push the little metal pieces that hold the glass in as far into the frame as you can or pull them out with a pair of pliers. Tie the tulle around the frame in whatever pattern you like. I tied all mine on the same side, but you could tie some in front and some in back if you like. Keep tying until you like how full it is, or until you run out of tulle.

That's it! I used a thin black ribbon to tie around the top of the frame and into my ghost bell, which hangs about half way down. I used a decoration that is the same on both sides so I can make either side the front. I like the tulle peaking out the back and my kids like it all puffy, so we can change it up! Hang it whichever way you like and enjoy your quick and easy project!
Decorative Glass Plates
Mod Podge decorative plates.

materials- clear glass plate (got ours at K-mart)
paint
mod podge
paint brush
scissors or circle cutter
HOW TO
1. clean your plate, allow to dry
2. cut a picture you like into a circle, just smaller than the size of the inside circle part of the plate. Paint just on the outter part of the inside rim of plate (where the picture will be). you don't need a lot of paint here, just enough to cover the edges of the picture and blend it in.
4. modpodge back of picture to help protect it. allow to dry.
5. paint. we did a multi tone paint. so, start with your lighter or main color paint sponge brush the rim of the plate. allow this color to dry.
6. repeat paint step with each additional color.
7. once dry, cover with mod podge to seal it.
25 days countdown to Christmas
I didn't teach this class. Here is a link to another site that did one very similar. We added a 4x4 cut the a little bigger than the two squares and added words to it. we also used vynil. Hope this helps you out!  http://littlebirdiesecrets.blogspot.com/2009/11/christmas-countdown-blocks.html
http://littlebirdiesecrets.blogspot.com/2009/11/christmas-countdown-blocks.html
Word Blocks
These word blocks are fast, and fun!
cut your blocks whatever size you want them. Sand them, and paint or stain them the desired colors.
Pick paper to match your color scheeme.
We used a cricut to cut out the letters we wanted. We used black card stock, however you could use vynil as well.
after the paint/stain is dry, modpodge the paper onto the block.
Once the paper is dry, modpodge the letter onto the paper. Make sure you push down firmly on the paper and letters to get it evenly stuck, this will help eliminate air bubles.
That's it! Unless you want to dollit up with more ribbions, you are done!
Enjoy
the original post for these is found herehttp://peakviewenrichment.blogspot.com/2008/09/word-blocks-create-lasting-fun-or.html .
Wire Family Tree Tuorial
Wire Family Tree


(here's the link with a picture)http://peakviewenrichment.blogspot.com/2008/09/word-blocks-create-lasting-fun-or.html
(here's the link with a picture)http://peakviewenrichment.blogspot.com/2008/09/word-blocks-create-lasting-fun-or.html
II apologize to everyone for the frustration in not getting answers! I did this blog just for that super Saturday, and had no idea it would get to be so popular! It was the first blog post I had ever done, and I didn’t know people could ask questions. So sorry to everyone!
I apologize I have no pictures for the tutorial, but I made that years ago.
Here’s the specifics I can remember.
Materials:-
picture frame, glass and backing removed.
black foam board.
20 gauge wire (mine was silver, but you can use any color) you can probably go a little thicker if you want to.
28 gauge wire
wire cutters
needle nose pliers
silver paper (even wrapping paper in a pinch), or really thin metal (be real careful with the metal, it is super sharp once you cut it, but you can get sheets thin enough to cut with scissors at a craft store.
green ribbon, and other colors if wanted- I used quarter inch, but you can use any size you want.
some time and patience.
hot glue or E600 glue-or other strong glue.
HOW TO DO IT
1. FRAME Pick whatever size/color frame you want. (Mine was an 11x16 size) – remove glass and cardboard.
2.CUT black foam board (from any craft store). Cut the foam board to fit snugly inside your frame. You can put it in at this point.
3.CURLS Using your wire cutters, tart cutting your 20 gauge wire into strips- the sizes vary, because your frame sizes will vary. I started with the trunk, so mine were probably 8 or so inches long. Using your needle nose pliers, curl one end into a pretty curl. Just keep cutting and curling and laying out on the foam board until you get the size tree you want.
Don’t forget to leave room on your foam board for the edges of the frame! if you think you might forget, put it in the frame and work around it. it isn’t much harder to do it this way. Whatever makes you happy.
4. ADHERE You can probably glue the pieces in, but any mess ups and it will show. I used the 28 gauge wire, cut into small strips, and made a very small horseshoe brad kind of a thing, put it around where two wires came together and pushed it into the foam board. it will show, but we will take care of that in a second.
5.TRUNK wrap the trunk of your tree with 28 gauge wire (and or ribbon) I did mine with wire first, then covered it in ribbon. When you do the ribbon, just leave the ends long so you can tie a bow, or add one at the very end. You can hot glue this one down if you are careful with your glue, or just use the wire, you can’t see it once you put your bow on.
6. LEAVES- These are not just décor, they help cover up some of your small 28 gauge wires that hold it all together. Use your metal (or paper) and cut out little leaf shapes. I then indented the metal, (but you could do it with paper and a non working pen or anything with a ball on one end too, I would think) to look like veins on the leafs. Once you are happy with how many leaves you have, start gluing them on.
7.PRETTY IT UP! Then use pictures and ribbon to finish the project off. you can either poke a hole in the picture and tie the ribbon on through the hole or just glue the ribbon and picture in place.
8. LOOSE ENDS if you haven’t done so already, put the foam board into the frame. You may need to glue it in if you don’t have any of those little brackets in the back.
I added a cute saying “My greatest blessings call me Grandma” mounted on cardstock to mine.
That’s it! You are all done!
Hope this was helpful!
If you want it on a wood plaque and not in a frame, just pick your plaque, paint it ,and follow all other instructions. You will need to glue it, so be very careful with the glue and cover it with leaves and bows.
Letha
Subscribe to:
Posts (Atom)